A Comprehensive Guide to Installing Replacement Windows in Rockville MD

Construction worker with tape measure Construction worker measuring with tape Window contractor stock pictures, royalty-free photos & images

Replacing windows can greatly enhance the energy efficiency, appearance, and overall value of your home. While the process may seem daunting, following a systematic approach will ensure success. Below is a detailed step-by-step guide to help you install replacement windows efficiently.

Tools and Materials You’ll Need

  • Measuring tape
  • Level
  • Pry bar
  • Hammer
  • Screwdriver or drill
  • Utility knife
  • Replacement window(s)
  • Insulation foam or weatherstripping
  • Exterior caulk
  • Shims

Step-by-Step Installation Process

  1. Inspect the existing window frame for damage. Ensure it is structurally sound and free of rot or cracks.
  2. Measure the dimensions of your current window opening (width, height, and depth) several times to confirm accuracy. Proper measurements are crucial for ensuring the replacement fits properly.
  3. Begin by removing any interior trim around the existing window using a pry bar.
  4. Take out any sashes or glass panes carefully to avoid breakage.
  5. Remove nails or screws holding the old frame in place and pull out the entire frame.
  6. Clean out debris, dirt, or old caulk from around the opening.
  7. Check for signs of water damage or wood rot in the surrounding structure. Repair any issues before proceeding.
  8. Place your new replacement window into the opening to ensure it fits snugly without forcing it in.
  9. Use shims at various points around the frame to level it as needed.
  10. Once satisfied with its fit, secure your replacement window by screwing it into place using pre-drilled holes provided by the manufacturer.
  11. Double-check that it is level using a spirit level before tightening all screws fully.
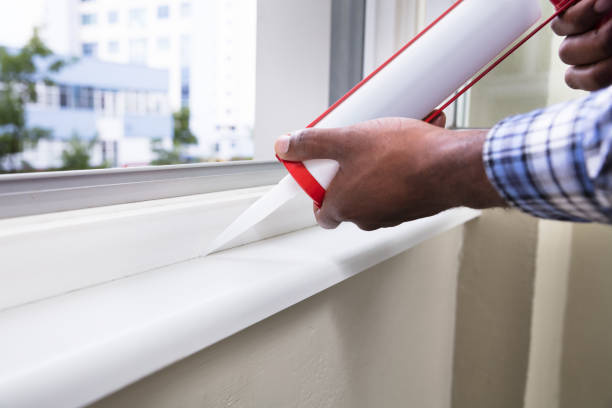
  12. Seal Gaps: Fill any gaps around your newly installed window with insulation foam or weatherstripping to prevent air infiltration.
  13. Apply Exterior Caulk: Seal along all edges of your window on both interior & exterior sides frame gaps/weatherproofness protection final step

Markdown-table

A Comprehensive Guide to Window Installation Rockville: Measuring for the Perfect Fit

Accurate measurements are crucial when replacing windows to ensure a perfect fit and avoid issues like air leaks, water infiltration, or structural damage. This guide walks you through the essential steps for measuring your windows properly and effectively.

Tools You’ll Need

Before you begin, gather the following tools to make the process efficient and precise:
– Measuring tape (preferably a steel one for accuracy)
– Notepad or measuring sheet
– Pen or pencil
– Level (optional but helpful for checking alignment)

Step-by-Step Guide to Measuring Windows

  1. Measure the width of the window opening in three places: top, middle, and bottom.
  2. Start from jamb to jamb, avoiding any obstructions like parting beads.
  3. Record all three measurements and use the smallest one as your width measurement. Using the smallest ensures a snug fit even if there are slight irregularities in the frame.
  4. Measure from the sill (the bottom-most horizontal part of your window) to the top of the frame in three spots: left, center, and right.
  5. Like with width, note all three numbers and take down the smallest one as your final height measurement.
  6. Check if your replacement windows require a specific depth measurement by consulting manufacturer instructions.
  7. To measure depth, start at the inside edge of your window opening and extend outward until you reach where any trim or stops begin.
  8. Verify Square Alignment (Optional)
  9. Use a level or measure diagonally across opposite corners of your window opening.
  10. If both diagonal measurements aren’t equal, this may indicate that your window frame is not square.

Common Mistakes to Avoid

  • Skipping Multiple Measurements: Only taking one width or height measurement can lead to inaccuracies due to uneven frames. Always take multiple readings at different points.
  • Neglecting Depth: Some replacements require precise depth sizes; overlooking this step can result in improper fitting.
  • Ignoring Frame Condition: Warped or damaged sills may impact how snugly replacement windows fit into place.

Recording Your Measurements

Measurement Area Point 1 Point 2 Point 3 Final Measurement
Width
Height
Depth N/A N/A N/A

Fill out this table as you take measurements from each section of your window frame.

Tips for Special Situations

  • For unusually shaped windows (e.g., arched or circular), consult professional guidance or templates provided by manufacturers.
  • Ensure there are no obstructions like curtains or blinds when measuring.
  • Double-check all numbers before purchasing replacement windows; even minor discrepancies can cause installation challenges.

Properly measured windows lead to better energy efficiency and an overall cleaner appearance once installed—making this step an essential foundation for successful window replacement projects.

Comprehensive Guide to Window Repair Rockville MD: Measuring Windows for Replacement

Proper measurements play a critical role in successfully replacing windows. Whether you are undertaking a DIY project or preparing for professional installation, accurate measurements ensure that your replacement windows fit seamlessly, minimize energy loss, and enhance the overall aesthetics of your home. This guide walks you through essential steps and tips to achieve precise window measurements.

Tools You’ll Need

  • Measuring tape (preferably metal for rigidity and precision)
  • Pen or pencil
  • Notebook or measuring sheet (to record dimensions)
  • Level (optional but useful for checking alignment)

Key Areas to Measure

  1. Measure at three points: top, middle, and bottom of the window opening.
  2. Use the smallest measurement from these three as your final width measurement.
  3. Record it carefully in inches (or millimeters if required).
  4. Similarly, measure at three points: left side, center, and right side of the window frame from top to sill.
  5. Again, use the smallest measurement of these as your final height dimension.
  6. Check whether your window opening has enough depth to accommodate modern replacement windows. Most replacement units require at least 3 1/4 inches of depth.
  7. Measure from the inside trim or wall surface to the outer edge of the frame.

Additional Measurement Tips

  • Double-check all measurements: Repeating each step ensures accuracy and avoids costly mistakes during installation.
  • Round down dimensions: When dealing with fractions or irregularities in size, slightly round down to prevent ordering oversized windows that won’t fit properly.
  • Account for Window Style: If you’re switching from one style to another (e.g., single-hung to casement), consult with a manufacturer or expert since additional adjustments may be required.

Common Mistakes To Avoid

  1. Measuring only once – Always verify results with multiple attempts.
  2. Ignoring irregular openings – Older homes may have warped frames that require custom solutions.
  3. Forgetting existing obstructions – Note any protrusions like handles or hardware that may affect fitting.
  4. Misjudging depth – Shallow frames can lead to improper insulation if not assessed correctly.

Sample Table for Recording Measurements

Window Location Width (inches) Height (inches) Depth (inches) Notes
Living Room 35 72 3 1/4 Standard fit
Bedroom 1 28 60 3 Narrower depth frame
Kitchen 30 48 3 1/4 Check corner angles

This table allows you to stay organized while ensuring no detail is overlooked.

Professional Help vs DIY Measurements

If you’re uncertain about your ability to take accurate measurements due to irregular frames or complex designs, consulting a professional ensures a perfect fit without guesswork.

By investing time in careful planning and precise measuring techniques, you can avoid costly errors while ensuring your new windows enhance energy efficiency and improve curb appeal effectively.

Rockville Window Replacement: DIY vs. Hiring a Professional – Which Option is Best?

Choosing between a do-it-yourself (DIY) approach and hiring a professional window installation company is an important decision when replacing windows in your home. Each option comes with its own set of benefits and challenges, and the right choice depends on your budget, skill level, and time availability. This guide will break down the pros and cons of both approaches to help you make an informed decision.

Benefits of DIY Window Installation

  • Cost Savings: One of the most significant advantages of a DIY installation is saving money. By doing it yourself, you eliminate labor costs associated with hiring professionals.
  • Flexible Scheduling: You can work at your own pace and schedule without waiting for an appointment.
  • Skill-Building: Completing a window installation on your own can help you build valuable skills for future home improvement efforts.

However, while cost savings are appealing, it’s essential to consider whether the effort required outweighs these benefits.

Challenges of DIY Window Installation

  1. Accuracy Issues: Measuring for replacement windows requires precision. A small error can lead to improper fit or poor energy efficiency.
  2. Time-Consuming: Installing windows often takes longer than anticipated, especially if you’re inexperienced.
  3. Risk of Mistakes: Without proper tools or knowledge, mistakes during installation can cause leaks, drafts, or even structural damage.
DIY Pros DIY Cons
Cost-effective Requires technical expertise
Control over schedule Errors may incur additional costs
Opportunity to learn May not meet professional standards

Benefits of Hiring a Professional Window Installation Company

  • Expertise & Experience: Professionals come equipped with the skills and tools necessary to perform an accurate window installation.
  • Guaranteed Workmanship: Many companies offer warranties on their labor, providing peace of mind in case issues arise later.
  • Time Efficiency: Professionals can complete the job quickly and efficiently compared to inexperienced homeowners.

Additionally, professionals are knowledgeable about local building codes and energy-efficiency requirements that may apply to your project.

Drawbacks of Hiring Professionals

  1. Higher Costs: Labor charges can significantly increase the overall expense.
  2. Scheduling Constraints: Finding an available contractor may require waiting weeks or months.
  3. Lack of Control Over Process: Certain aspects like timeline or product selection may be dictated by the hired company.
Professional Pros Professional Cons
High-quality results Higher upfront costs
Time-efficient Limited control over scheduling
Warranty availability Dependence on contractor

Factors to Consider When Deciding

  1. Do I have prior experience with similar home improvement projects?
  2. Am I comfortable using tools such as levels, drills, or caulking guns?
  3. How much time can I realistically dedicate to this project?
  4. Is my budget flexible enough to cover professional fees if needed?
  5. What is my tolerance for potential errors or rework?

By weighing these considerations carefully alongside the pros and cons outlined above, you’ll be well-prepared to choose the method that best suits your situation.

Whether you go with a DIY approach or hire an expert team depends largely on your personal circumstances—such as skill set, budget constraints, timeline flexibility—and how confident you feel about tackling such projects independently versus relying on trained installers for optimal results.

Close-up of a handyman fixing window frame Close-up of a handyman fixing window frame Window contractor stock pictures, royalty-free photos & images

Exploring DIY and Professional Solutions for Fixing Foggy Rockville Windows

Foggy double-pane windows can be both unsightly and problematic, as they indicate a failure in the window’s seal. This allows moisture to seep between the panes, compromising visibility and reducing energy efficiency. Below, we’ll explore various approaches to tackling this issue, including DIY methods and professional solutions.

Understanding Why Double-Pane Windows Fog Up

  • Age: Seals naturally weaken after years of exposure to weather conditions.
  • Temperature Fluctuations: Repeated expansion and contraction from weather changes can damage seals.
  • Excessive Moisture: High humidity levels may contribute to seal deterioration.

When seals fail, moisture enters the space between panes, creating condensation or fogging.

DIY Solutions for Defogging Double-Pane Windows

  1. Use a Dehumidifier
    A portable dehumidifier placed near the affected window can help reduce internal condensation. While this won’t repair damaged seals, it may clear visible fog temporarily.
  2. Apply Desiccant Packs
    Desiccant materials—such as silica gel—can absorb trapped moisture inside the window unit. You can drill a small hole in the pane’s corner (if you’re confident in your skills) and insert desiccant packets.
  3. Drill a small vent hole in one corner of the outer glass pane.
  4. Allow warm air to circulate through it using a hairdryer on low heat.
  5. Seal the hole afterward with clear epoxy glue.

Note: This method is risky and requires precision tools; improper handling could worsen damage.

  1. Clean with Anti-Fog Products
    Anti-fog sprays or cleaning solutions found at hardware stores may temporarily improve visibility by creating a clear film over glass surfaces.

Professional Solutions for Long-Term Results

  • Professionals use specialized equipment to remove moisture between panes.
  • They reseal the window unit and sometimes refill it with inert gas like argon.
  • This option is typically more affordable than full replacement but does not restore full insulation efficiency.
  • If only one pane is damaged or fogged up, replacing just that specific glass piece could be an economical solution.
  • It’s essential that replacement glass matches existing specifications (thickness, material type).
  • When seals cannot be reasonably repaired or multiple issues affect your windows (e.g., cracked frames), replacing the entire unit ensures optimal performance.
  • Considerations include energy-efficient upgrades such as Low-E coatings or triple-pane designs.
Solution Cost Range Durability
Dehumidifier $20–$200 Short-Term
Desiccant Packs $10–$50 Short-Term
Professional Seal Repair $100–$300/window Medium-Term
Glass Pane Replacement $200–$500/pane Medium-Term
Full Window Replacement $400–$1,200/unit Long-Term

Preventing Future Fogging Issues

  • Ensure proper caulking around window frames to keep out external moisture.
  • Regularly inspect seals for signs of wear or deterioration.
  • Control indoor humidity levels using dehumidifiers or ventilation systems.

By understanding the root causes of fogging and evaluating both DIY fixes and professional services carefully, you can restore clarity while extending your window’s lifespan effectively.

Handyman fixing the window with screwdriver Handyman fixing the window with screwdriver Window contractor stock pictures, royalty-free photos & images

DIY and Professional Solutions for Fixing Foggy Windows in Rockville, MD

Double-pane windows are an excellent choice for homeowners due to their energy efficiency and noise-reducing qualities. However, one common issue many face is condensation or fogging between the panes. This can not only obstruct visibility but also indicate a breakdown in the window’s seal. Below, we explore both DIY and professional solutions to address foggy double-pane windows.

Understanding the Cause of Fogging

Fogging occurs when moisture gets trapped between the panes of glass. This typically happens due to: – Broken or aged seals around the window. – A failure in the desiccant material (used to absorb moisture) within the spacer. – Temperature fluctuations leading to pressure changes inside the glass unit.

DIY Solutions for Fixing Foggy Windows

  1. Place a dehumidifier close to the affected window.
  2. This method helps reduce excess moisture in your home, which may alleviate condensation.
  3. Carefully drill two tiny holes into opposite corners of the outer layer of glass.
  4. Use a defogging spray or desiccant material to remove trapped moisture inside.
  5. Seal the holes with clear waterproof sealant after cleaning.
  6. Use a hair dryer on low heat near the edges of the window.
  7. The warm air helps evaporate moisture inside, although this is likely a temporary solution.

Note: While these methods might reduce visible fogging, they are often short-term fixes and may not restore full functionality or insulation properties.

Professional Solutions for Defogging

For long-term results and effective repair, consider consulting professionals who specialize in window restoration services.

  1. Specialists use advanced techniques where they drill small holes, remove trapped moisture, clean internal surfaces of glass panes, and reseal them with anti-fog agents.
  2. Cost-effective compared to full replacement but depends on window severity.
  3. If seals have deteriorated completely, professionals can replace them instead of recommending full window replacement.
  4. This restores insulation benefits while maintaining your existing windows.
  5. Full Window Replacement Sometimes damages extend beyond simple repairs (e.g., constant seal failure). In such cases: | Pros | Cons | |————————–|————————–| | Improved energy efficiency| Higher initial costs | | Enhanced aesthetics | Longer installation time | | Eliminates future issues | |

Preventative Measures

To avoid future fogging problems: – Regularly inspect seals for signs of wear or damage. – Maintain proper indoor humidity levels (30%-50% recommended). – Avoid excessive cleaning products that may weaken sealing materials over time.

By understanding both DIY fixes and professional restoration options, you can make an informed decision about how best to tackle fogged double-pane windows while preserving their long-term performance and value.


Step-by-Step Guide to Window Repair in Rockville MD for Homeowners

Close Up Of Construction Worker Preparing To Fit New Windows Close Up Of Construction Worker Preparing To Fit New Windows Window contractor stock pictures, royalty-free photos & images

Replacing windows on your own can be a cost-effective and rewarding task if done correctly. This guide provides a detailed, step-by-step approach to help homeowners install replacement windows with confidence. Proper preparation and attention to detail are crucial to ensure a professional-quality result.

Tools and Materials You’ll Need

  • Measuring tape
  • Pry bar
  • Utility knife
  • Level
  • Hammer or drill
  • Screwdriver set
  • Caulking gun
  • Replacement window(s)
  • Screws or fasteners (provided with the window kit)
  • Insulation foam or weatherstripping
  • Exterior-grade caulk or sealant

Having these items ready will streamline the process and minimize interruptions.

Steps for Installing Replacement Windows

  1. Measure Your Window Opening
    Accuracy matters when ordering replacement windows.
  2. Width:Measure across the top, middle, and bottom of the frame.
  3. Height:Measure on the left, center, and right sides.
    Use the smallest measurements for both width and height when ordering your new window.
  4. Remove the Old Window
    Begin by removing any existing sash stops or interior trim around the old window using a pry bar. Be cautious to avoid damaging surrounding walls or molding.
    Steps:
  5. Remove screws holding the old frame in place.
  6. Use a utility knife to cut through caulk or paint seals.
  7. Carefully pull out the old frame and sash.
  8. Inspect and Prepare the Opening
    Before installing your new window:
  9. Check for damage in the wall frame (e. g. , rot or mold) and repair as needed.
  10. Clean out debris from the opening.
  11. Apply weatherproofing tape if recommended by your window manufacturer.
  12. Test-Fit Your New Window
    Place the replacement window into the opening temporarily to ensure it fits properly. Use a level to confirm alignment both horizontally and vertically.
  13. Secure Your New Window
    Once satisfied with fit:
  14. Apply caulk along areas where water might seep through after installation.
  15. Position the window into place.
  16. Secure it using screws or fasteners provided in your kit, following manufacturer instructions.
  17. Insulate Around Frame
    Fill gaps between the new window frame and wall opening using insulation foam or weatherstripping. Overfilling can cause warping, so apply an appropriate amount that expands evenly.
  18. Seal Edges With Caulk
    Finally, seal around all external edges of your newly installed window using exterior-grade caulking material. Smooth out excess caulk with a tool for better appearance and durability.
  19. Replace Trim/Molding
    Reinstall interior trim pieces you removed earlier, ensuring they fit flush against your new window.

Tips for Success

Here are some practical considerations: – Purchase energy-efficient windows certified by ENERGY STAR® for long-term savings on heating/cooling bills. – Work on one window at a time to simplify logistics. – Follow all safety precautions when handling glass panes during removal/installation. – Enlist help if you’re working on large-sized windows; lifting solo may pose risks of damage or injury.

Common Mistakes How To Avoid Them
Inaccurate measurements Measure multiple times before ordering replacements
Over-tightened fasteners Tighten screws until secure without over-stressing frames
Using improper sealants Opt for exterior-grade waterproof caulks only

By following this guide meticulously, homeowners can achieve professional results that enhance energy efficiency while improving their home’s aesthetic appeal without relying on contractors’ assistance.

Effective Solutions for Cracked Sills and Replacement Windows Rockville MD

When window sills develop cracks or gaps, they can compromise the efficiency, durability, and visual appeal of your windows. Understanding the underlying causes and applying effective repair strategies is essential for maintaining your home’s integrity. Below, we’ll explore common causes of cracked and gapped window sills along with practical solutions.

Top Reasons to Consider Rockville Window Replacement for Damaged Sills

Cracks or gaps in window sills can occur due to various factors. Identifying the root cause is key to determining the most suitable repair method.

  1. Prolonged exposure to rainwater or condensation can weaken wooden or masonry sills, leading to cracking or swelling over time.
  2. Improper sealing around windows exacerbates moisture infiltration.
  3. Extreme changes in temperature cause materials like wood or concrete to expand and contract, which may result in cracks forming over time.
  4. Substandard installation practices, such as inadequate leveling or lack of support beneath the sill, can leave it vulnerable to damage.
  5. Over time, natural wear and tear take a toll on window sills made from wood, vinyl, or metal. Degradation from prolonged exposure leads to cracking or splitting.
  6. Termites and other wood-damaging pests may cause structural damage that manifests as cracks in wooden sills.

Top Solutions for Rockville Windows with Cracked Sills

1.Wooden Window Sill Repairs

  • Step 1:Clean the damaged area by removing loose debris or rotten wood with a scraper.
  • Step 2:Apply a wood filler (or epoxy filler) into cracks using a putty knife.
  • Step 3:Smooth out the filler so it aligns with undamaged portions of the sill.
  • Step 4:Allow it to dry completely before sanding it smooth.
  • Step 5:Paint over the repaired area with weather-resistant paint for added protection.
Pro Tip: Use high-quality primer before painting wooden sills for improved durability against moisture and UV damage.

2.Concrete Window Sill Repairs

Tools You’ll Need Materials Required
Trowel Concrete patch material
Wire brush Sealant
Safety gloves
  • Remove debris from cracks using a wire brush.
  • Mix concrete patch material as per manufacturer instructions.
  • Apply patching compound into cracks with a trowel until level with surrounding surfaces.
  • Let it cure fully before applying sealant for weatherproofing.

3.Vinyl Window Sill Repairs

Repairing vinyl typically involves replacing damaged sections rather than repairing them directly: – Measure dimensions of affected parts carefully. – Replace damaged pieces with compatible vinyl trims purchased from hardware stores.

Preventative Maintenance Tips for Windows Rockville MD

To avoid recurring issues with cracked or gapped window sills: – Ensure proper sealing around windows annually using caulk or weatherproof tape. – Conduct regular inspections after storms for early signs of wear/damage. – Repaint wooden surfaces every few years using high-grade exterior coatings designed for windows.

Addressing small issues early prevents more costly repairs down-the-line while preserving functionality & curb appeal long-term!

Expert Window Installation Rockville: Causes of Cracked Sills and Repair Solutions

Cracked and gapped window sills are not only an eyesore but can also compromise the structural integrity of your windows, lead to energy inefficiencies, and even invite moisture-related issues such as mold or rot. Addressing this issue promptly is crucial to maintaining the functionality and appearance of your windows. Below, we explore common causes of cracked or gapped window sills as well as effective repair solutions.

Caulking gun Technician man hand holding and using manual caulking glue gun or silicone tube to seal the expansion joint between cement wall and steel material at aluminium door. Construction maintenance concept. Window contractor stock pictures, royalty-free photos & images

Common Causes of Cracked and Gapped Window Sills

  1. Prolonged exposure to rain or condensation can cause wooden window sills to absorb water over time. This leads to swelling, cracking, or rotting in severe cases.
  2. For concrete or stone sills, repeated freezing and thawing cycles can cause cracks due to expansion.
  3. Constant exposure to fluctuating temperatures causes materials like wood, vinyl, or aluminum to expand and contract. Over time, this movement can weaken the sill structure, resulting in gaps or cracks.
  4. When a window sill is improperly installed without adequate support or sealing, it may develop gaps where materials meet.
  5. Wooden sills naturally degrade with age if not properly maintained with sealing or painting.
  6. Materials like vinyl may become brittle over decades of sun exposure.
  7. Foundation settling or shifts in the structure of your home might put pressure on window frames and sills, causing them to crack over time.

Start by examining how severe the damage is:
Minor Cracks:Superficial issues that do not compromise functionality can often be repaired using simple methods like fillers.
Severe Damage:If significant portions are rotten, warped, or structurally unsound, replacement might be necessary.

Tools Materials
Putty knife Wood filler/epoxy resin
Sandpaper (medium & fine grit) Paint/varnish/sealant
Utility knife Caulking material
Chisel (for removal) Primer (if painting afterward)
  1. Clean the Surface:Remove dirt, old paint flakes, or loose debris using a putty knife.
  2. Apply Filler:Use wood filler (for wooden sills) or epoxy-based fillers (for other materials) to cover cracks and gaps evenly.
  3. Smooth the Surface:Once dried according to product instructions, sand down excess filler until smooth.
  4. Seal & Paint:Apply a weather-resistant sealant followed by paint that matches your existing sill color for protection against future damage.
  1. Detach Damaged Sections:Carefully chisel away rotted pieces; ensure you stop at structurally sound material.
  2. Cut Replacement Pieces:Use durable wood (e. g. , cedar) cut with precision to fill removed sections.
  3. Secure New Material:Attach replacement pieces with screws/brackets; apply caulk along seams for airtight results before sealing/painting.

Preventative Tips for Long-Term Maintenance

  • Regularly inspect sills for signs of wear like peeling paint or small cracks.
  • Reapply weatherproof sealants every couple of years based on environmental conditions.
  • Address drainage problems near windows that could cause water pooling.
  • Check indoor humidity levels to prevent excess condensation buildup during colder months.

By understanding what causes cracked and gapped window sills—and how those issues can be effectively repaired—you’ll prolong their lifespan while maintaining both aesthetic appeal and energy efficiency in your home’s windows system effectively over time.

Broken Windows – Understanding Causes, Repair Options, Costs, and Key Considerations

Broken windows are a common issue that can arise due to various factors, ranging from weather-related damage to accidental impacts. Understanding the causes, exploring repair options, estimating costs, and considering key factors before proceeding with a repair can help homeowners make informed decisions. Below is an in-depth look at each aspect.

Common Causes of Broken Windows

Identifying the root cause of a broken window is crucial for determining how to address it effectively.

  • Strong winds or storms can break glass panes or damage window frames.
  • Hail and flying debris during extreme weather events often lead to cracks or shattering.
  • Stray objects like baseballs or falling tree branches may result in broken glass.
  • Improper handling during cleaning or maintenance can also lead to accidental damage.
  • Over time, window materials (frames and seals) may degrade due to exposure to sunlight, moisture, and temperature changes.
  • Old windows with fragile glass are more susceptible to breakage under minimal pressure.
  • Burglaries or attempted forced entries often involve deliberate breaking of windows.

Effective Repair Options for Broken Windows

  1. For broken or cracked glass panes that cannot be salvaged.
  2. Requires precise measurements for proper fitting.
  3. Can be done as a DIY project or by hiring professionals.
  4. Dented, warped, or rotting window frames can be restored using fillers (for minor damages) or replaced entirely if severely damaged.
  5. Wood filler works well for minor dents in wooden frames.
  6. If gaps form between the frame and glass due to broken seals, reapplying caulk ensures proper insulation.
  7. Use clear tape over cracks to prevent further spreading until repairs are made.
  8. Install cardboard panels or temporary plastic sheeting for shattered windows as a short-term fix.

Estimated Costs for Repairs and Replacements

Type of Service Estimated Cost Range
Glass pane replacement $150 – $300 per standard pane
Full window replacement $400 – $1,000+
Frame repair $100 – $300
Replacing seals/caulking $50 – $120

Note: Custom-sized windows or specialized glazing options can significantly increase these costs.

Key Considerations When Repairing Broken Windows

  • Energy Efficiency Needs:
  • Match with Existing Design:
    Replacing parts that complement your home’s existing aesthetic maintains visual consistency.
  • Professional vs DIY Repairs:
    Simple fixes like caulking gaps may be manageable as DIY projects. However, extensive repairs (e. g. , replacing large panes) require professional expertise for proper installation and safety compliance.
  • Age of Window System:
    Older windows nearing their life expectancy may benefit from complete replacement instead of repeated repairs over time.

By addressing these considerations carefully and selecting the appropriate repair solution based on individual needs and budget constraints, homeowners can restore functionality while ensuring safety and efficiency in their homes’ window systems.

How much does window installation cost?

The cost of window installation can vary greatly depending on several factors. Homeowners often find it challenging to estimate these expenses due to the number of variables involved. Understanding these factors can help you budget effectively and make informed decisions when hiring a professional window installer.

Home painter painting on top of the window Man painting the wall between ceiling and the window, using tiny brush Window contractor stock pictures, royalty-free photos & images

Key Factors That Influence Window Installation Costs

  1. Type of Windows
    The type of windows you choose plays a major role in determining installation costs.
  2. Single-hung windows: More affordable but less energy efficient.
  3. Double-hung windows: Slightly more expensive, offering better ventilation and ease of cleaning.
  4. Casement windows: Hinged on one side, often pricier due to complex mechanisms.
  5. Bay or bow windows: Larger installations with higher costs due to their size and design intricacies.
  6. Material Used for Window Frames
    Different frame materials come with varying price tags and durability.
    | Material | Average Cost Per Window | Durability | Maintenance Required | |———————-|——————————-|—————————————|———————————–| | Vinyl | $150 – $800 | High durability | Low | | Wood | $200 – $1,000 | Excellent insulation but prone to rot| Regular sealing or painting | | Aluminum | $250 – $1,200 | Lightweight and durable | Low | | Fiberglass | $300 – $1,500 | Highly durable with great insulation | Very low |
  7. Labor Costs
    Professional installers charge based on project complexity, location, and company-specific rates.$100 to $300 per window, though difficult installations may cost more.
  8. Size and Design Complexity
    Large or custom-shaped windows require extra effort during installation, resulting in higher costs.
  9. Energy Efficiency Features
  10. Condition of Existing Frames
    If your current frames are damaged or need replacement before installing new windows, this will add repair or retrofit costs to your project.

Average Cost Overview

Type Of Project Average Price Range (Including Labor)
Standard replacement – vinyl $300 – $850
Energy-efficient upgrade – wood $650 – $2,000
Large custom projects – bay/bow $2,000 – $8,000

Additional Considerations

  • Permits:Some areas require permits for window replacements; ensure this is factored into your budget.
  • Warranty:Look for installers offering warranties on both materials and labor for extra peace of mind.
  • Seasonal Pricing:Peak seasons may result in higher labor costs compared to off-seasons when demand is lower.

Understanding these various components helps homeowners make educated choices regarding materials and services while managing their budgets effectively during window installations or upgrades.

Both double and triple glazing offer substantial benefits compared to single-pane windows, but each has its unique advantages and factors to consider. Here’s a detailed comparison to help you determine which option suits your needs.

This design creates an insulating barrier that reduces heat loss and minimizes noise transmission.

Benefits of Double Glazing:Energy Efficiency: Noise Reduction:Provides decent soundproofing, making it suitable for urban areas. Affordability: Generally more cost-effective than triple glazing. Widely Available: Compatible with most window frames, making installation easier.

This extra layer adds further insulation but comes at a higher cost.

Benefits of Triple Glazing:Superior Thermal Performance: Ideal for colder climates. Enhanced Noise Reduction: Provides excellent soundproofing due to the additional pane. Reduced Condensation: Improved Security: More panes make it harder to break through the window.

Key Factors to Consider

Feature Double Glazing Triple Glazing
Thermal Efficiency High Very High
Sound Insulation Good Excellent
Cost Lower upfront cost Higher upfront cost
Weight Lighter and easier to install Heavier; may require stronger frames
Suitability Suitable for mild-to-moderate climates Best for extremely cold climates

When Should You Opt for Double or Triple Glazing?

  1. In colder regions where temperatures frequently drop below freezing, triple glazing provides superior insulation.
  2. Those willing to invest in long-term energy savings may find triple glazing worth the higher initial expense.
  3. Homes near busy roads or airports benefit from the enhanced noise reduction provided by triple glazing.
  4. Older properties with traditional window frames may not support the weight of triple-glazed units without additional structural adjustments.

Final Considerations

Carefully evaluate these factors before making an investment in new windows that will serve you effectively for years to come.

When is it time to replace windows at home?

Knowing when it’s time to replace your windows can save you money in the long term and help avoid complications down the line. Below are some key indicators and tips to help you determine if it’s the right time for window replacement.

Signs It’s Time to Replace Your Windows

  1. If you feel drafts near your windows or notice uneven temperatures in your home, it may be a sign that the windows are no longer sealing properly.
  2. Test this by holding a lit candle or lighter near the window edges on a windy day; flickering indicates air leakage.
  3. Old or inefficient windows often lead to higher heating and cooling costs because they fail to provide adequate insulation.
  4. Double- or triple-pane windows often develop condensation between panes if their seals have failed, reducing their insulating effectiveness.
  5. Cracks in glass or damage to frames (such as rotting wood, warping, or peeling) affect both aesthetics and functionality.
  6. Warped frames may make opening and closing windows difficult.
  7. If outside noise infiltrates your home easily, this could indicate poor insulation or single-pane glass that no longer meets modern standards.

Benefits of Replacing Windows

  • Improved Energy Efficiency: Modern energy-efficient models with double or triple glazing significantly reduce heat transfer.
  • Enhanced Aesthetics: New windows improve curb appeal with updated designs and materials.
  • Increased Home Value: Window replacement is one of the most cost-effective renovations for boosting resale value.
  • Better Security: Upgraded locks and stronger materials enhance safety.
  • Reduced Maintenance Needs: Newer materials like vinyl require less upkeep compared to older wood frames.

Questions to Ask Before Replacing Your Windows

Key Question Why It Matters
Are my current windows repairable? Some issues (like minor frame damage) can be fixed instead of replaced.
How old are my existing windows? Most modern windows last 15–20 years; older units might need replacement sooner.
What’s my budget? Costs vary based on materials, glazing options, size, and installation expenses.
What are my climate concerns? Consider factors like local weather patterns when selecting materials (e.g., vinyl for humid climates).

Replacement Timing Matters

Spring and early fall are ideal seasons for window replacement since milder weather reduces indoor temperature fluctuations during installation. Additionally, scheduling during these periods allows contractors better flexibility due to lower seasonal demand compared to winter months.

Professional Help vs DIY Installation

While DIY installation might save costs upfront, improper fitting can lead to air leaks, water damage, or reduced performance over time.
– Hire certified professionals with industry experience. – Ensure proper measurements are taken before ordering custom-sized units.

If opting for DIY installation: – Follow manufacturer instructions carefully. – Use high-quality caulking and insulation foam for sealing gaps effectively.

By replacing your outdated or damaged windows proactively rather than reactively (after severe failure), you preserve comfort indoors while avoiding escalating utility costs over extended periods of neglect.


Essential Tips for Window Installation Rockville Homeowners Should Know Before Starting

Man inspecting house window outside on day light A man inspecting house window outside on day light Window contractor stock pictures, royalty-free photos & images

Replacing the windows in your home is a significant decision that can impact energy efficiency, aesthetics, and overall property value. Before diving into this project, it’s essential to be well-prepared. Here’s what you need to know before starting.

Assess Your Needs and Goals

  • Improved Energy Efficiency: Outdated windows can lead to heat loss or drafts, increasing energy bills. Modern windows with double or triple glazing can enhance insulation.
  • Enhanced Curb Appeal: Newer designs and materials can update the appearance of your home.
  • Damage or Wear and Tear: If your current windows show signs of rot, cracks, or condensation between panes, replacement may be necessary.
  • Functionality: If old windows no longer open or close properly, it may compromise safety and comfort.

Clearly outlining your objectives will help guide decisions on materials, styles, and budget.

Research Window Types

Window Type Features
Double-Hung Windows Traditional look; both sashes slide vertically for ventilation.
Casement Windows Hinged at the side; open outward for maximum airflow and clear views.
Sliding Windows Panels that glide horizontally; ideal for modern homes or tight spaces.
Bay/Bow Windows Extend outward from the wall; provide extra space and enhanced aesthetics.
Picture Windows Fixed glass panes; maximize natural light but do not open for ventilation.

Each type has unique benefits based on functionality, appearance, and room requirements.

Set a Budget

  • Vinyl: Affordable with low maintenance needs but limited styling options.
  • Wood: Timeless aesthetic appeal but higher cost and maintenance requirements.
  • Fiberglass: Durable with excellent thermal performance but mid-to-high price point.
  • Aluminum: Lightweight yet strong; less efficient in extreme climates.
  • Energy-Efficient Features (e.g., Low-E coatings or gas-filled panes) often come at a premium but reduce long-term energy expenses.

It’s wise to get multiple estimates from contractors to ensure accurate budgeting.

Verify Local Building Codes and Permits

Some municipalities require permits for window replacements—especially when altering structural elements like enlarging an opening or changing egress standards in bedrooms. Contact your local building department before starting the project to avoid unnecessary delays or fines.

Choose High-Quality Materials

Prioritize durability by selecting reliable brands that offer warranties against defects such as seal failures or hardware malfunctions. Look for certifications like ENERGY STAR® ratings indicating superior energy performance.

Hire an Experienced Contractor

  1. Request referrals from family or friends.
  2. Check online reviews on platforms like Google Reviews or Better Business Bureau (BBB).
  3. Confirm credentials such as licensing and insurance coverage.
  4. Ask about warranty coverage both for materials used and installation services provided.
  5. Conduct interviews to gauge communication skills and professionalism.

A reputable contractor should address concerns transparently while providing clear timelines for completion.

Replacing your home’s windows is more than just an upgrade—it’s an investment in comfort, efficiency, and style when approached thoughtfully with proper planning steps outlined above ensuring success long term!

How Long Does the Full Replacement Windows Rockville MD Process Typically Take

When planning for a window replacement project, one of the most common questions homeowners ask is how long the entire process will take. The timeline for window replacement can vary depending on several factors, including the size of your home, the number of windows being replaced, the type of windows you’ve chosen, and any unforeseen challenges that may arise during installation. Below is a detailed breakdown to help you better understand what to expect.

Factors Affecting Window Replacement Timelines

  1. Replacing one or two windows may take just a few hours.
  2. Larger projects involving 10 or more windows could span multiple days.
  3. Standard-sized windows are typically quicker to install.
  4. Custom or specialty windows (e.g., bay, bow, or custom-shaped options) often require additional time for both manufacturing and fitting.
  5. If your current window frames are in good condition, installation is faster.
  6. Frames with rot, damage, or structural issues may need repairs or full replacement before new windows can be installed.
  7. First-floor installations are generally quicker than upper floors due to easier accessibility.
  8. Homes with unique architectural designs may require additional planning and labor.
  9. Rainy, snowy, or windy weather can delay outdoor work and extend timelines.
  10. The contractor’s schedule can impact how soon they start and complete your project.

Typical Window Replacement Timeline

Stage Estimated Time Frame
Initial Consultation & Measurements 1–2 weeks
Manufacturing/Ordering Windows 4–8 weeks (custom orders longer)
Installation Day(s) 1–3 days for most homes
Final Inspection/Cleanup Same day as installation

For standard projects involving a handful of windows in good condition frames, installation alone typically takes 4–8 hours per day over one or two days.

What Happens During Installation?

  1. Preparation (30–60 minutes): Contractors will protect furniture and flooring around work areas using drop cloths and plastic coverings to minimize mess during removal and replacement.
  2. Window Removal (15–30 minutes per window): Old windows are carefully removed without damaging surrounding structures such as siding or trim.
  3. Frame Inspection & Repairs (Varies): If necessary, installers will repair issues like rot or water damage before proceeding with the install.
  4. New Installation (20–40 minutes per window): Each new window is secured in place, leveled properly for alignment, sealed with caulk or foam insulation for energy efficiency, and tested for proper operation.
  5. Final Cleanup & Walkthrough (30–60 minutes): Debris is cleaned up thoroughly after all installations are complete. At this point, contractors may review operation instructions with homeowners.

Tips for Minimizing Delays

  • Choose your contractor carefully and confirm their timeline commitments upfront.
  • Order materials early if custom-sized windows are needed.
  • Prepare your home by clearing areas near work zones ahead of the contractor’s arrival.
  • Monitor weather forecasts and discuss contingency plans with your contractor if adverse conditions arise during installation week.

By understanding these variables and taking proactive steps where possible, you can streamline your project from start to finish while avoiding unnecessary delays.

How Long Does Window Repair Rockville MD Typically Take?

Understanding the timeline for a full window replacement process is essential for planning and managing expectations. While the timeframe can vary based on several factors, having a general guideline helps homeowners prepare effectively. Below, we’ll break down the typical time involved in each phase of the window replacement process and factors that can influence project duration.

Key Factors That Impact Rockville Window Replacement Timelines

  • Number of windows being replaced: Replacing one or two windows will naturally take less time than replacing all the windows in your home.
  • Window type and design: Standard, single-hung, or double-hung windows are often quicker to install compared to custom-shaped or oversized windows.
  • Materials used: The installation process may vary depending on whether you choose vinyl, wood, aluminum, or fiberglass frames.
  • Condition of existing frames: If your current window frames are damaged or rotted, additional repairs may extend the timeline.
  • Weather conditions: Rain or extreme cold can delay installation work and add more days to the schedule.
  • Experience of contractors: Professional and experienced contractors typically complete projects faster without compromising quality.

Timeline for Rockville Windows Replacement

Phase Estimated Timeframe
Initial consultation and quote 1–2 weeks
Custom window manufacturing 4–8 weeks (if applicable)
Removal and preparation 30 minutes – 1 hour per window
Installation per window 30 minutes – 2 hours
Post-installation cleanup A few hours (same day)

For an average home with 10–15 windows being replaced, most projects are completed within one to three days once installation begins. Custom orders or unforeseen complications may result in longer timelines.

Step-by-Step Guide to Windows Rockville MD Solutions

  1. Initial Consultation and Ordering
    After contacting a contractor, you’ll receive an assessment of your home’s needs. Measurements will be taken, and you’ll select materials and designs. If you’re opting for custom-made windows, additional manufacturing time applies.
  2. Preparation Before Installation Day
    Once your order arrives (if it’s custom), contractors will schedule an installation date. Homeowners should prepare by clearing furniture near the windows and removing any blinds or curtains.
  3. Removal of Old Windows
    On installation day, old windows are removed carefully. Each removal typically takes about half an hour unless there’s damage requiring extra repair work.
  4. Installation Process
    New windows are fitted into place securely using advanced techniques to ensure proper insulation and sealing against weather elements.
  5. Final Inspection & Cleanup
    After installations are complete, contractors inspect their work for quality assurance before cleaning up debris from your property.

Tips for Ensuring Timely Completion

To keep your project on track: – Work with licensed professionals who have experience in large-scale replacements. – Confirm product availability when choosing custom designs. – Plan around seasonal weather patterns for optimal working conditions. – Prepare your home ahead of time by clearing obstacles near window areas.

By understanding these details about timelines and processes involved in replacing home windows, homeowners can avoid surprises while ensuring their project’s success remains efficient from start to finish.

the master straightens the plastic window with a rubber mallet, after installing it the master straightens the plastic window with a rubber mallet, after installing it Window contractor stock pictures, royalty-free photos & images

Everything You Should Know About Window Replacement for a Remodeling Project

Window replacement is a critical aspect of many home remodeling projects. Whether you’re upgrading for energy efficiency, improving aesthetics, or addressing structural issues, understanding the ins and outs of window replacement during a remodel can save you time, money, and unnecessary stress. Below are key considerations and steps to guide you through the process.

Why Include Window Replacement in Your Remodeling Project?

  • Energy Efficiency: Modern windows with advanced insulation and glazing techniques can significantly reduce energy consumption.
  • Enhanced Aesthetics: New windows can complement your interior design while boosting curb appeal.
  • Improved Home Value: Replacing old or damaged windows increases your home’s resale value.
  • Noise Reduction: High-quality replacement windows help mitigate outside noise, creating a quieter indoor environment.

Factors to Consider Before Replacing Windows During a Remodel

  1. Are you replacing all windows or only specific ones?
  2. Will the window style change (e.g., switching from single-hung to casement)?
  3. Consider costs for materials, labor, and unforeseen adjustments.
  4. Allocate funds for energy-efficient models if sustainability is a priority.
  5. Wood: Offers natural beauty but requires maintenance.
  6. Vinyl: Durable, cost-effective, and low maintenance.
  7. Aluminum: Lightweight yet strong but less energy-efficient than other options.
  8. Compliance With Local Building Codes: Ensure that your new windows meet local regulations regarding safety standards and energy efficiency.

Types of Windows Best Suited for Remodeling Projects

Type Key Features Ideal Applications
Double-Hung Two operable sashes; easy cleaning Traditional homes
Casement Hinged at sides; great ventilation Modern or minimalist designs
Bay/Bow Multi-paneled; creates extra interior space Living rooms or kitchens
Picture Fixed; maximizes light with a clear view Areas without ventilation needs
Sliding Operates horizontally; space-saving design Small rooms with limited clearance

Steps to Align Window Replacement With Your Remodeling Timeline

  1. Plan Early in the Process
    Identify whether old frames need structural adjustments before finalizing other design elements like wall paint or trim installation.
  2. Schedule Installation Strategically
    Coordinate with contractors so that window installation occurs after demolition but before finishing touches such as flooring or cabinetry work.
  3. Protect Surroundings During Installation
    Clear areas around the installations and cover furniture or flooring to avoid damage from dust or debris.
  4. Test Fit and Inspect Thoroughly Before Finishing Work
    Ensure each window fits perfectly in its frame; check alignment, sealant application, and functionality before proceeding further in your remodel.

Common Challenges During Window Replacement in Remodeling Projects

  • Structural Damage Around Existing Frames:
    Solution: Address underlying issues like water damage before replacing windows to prevent future problems.
  • Mismatched Aesthetic With Other Renovation Features:
    Solution: Choose designs and finishes that align with other architectural elements in the remodel.
  • Delays Due to Supply Chain Issues:
    Solution: Order windows well ahead of time to account for manufacturing lead times or shipping delays.

Proper planning ensures that window replacement enhances both functionality and aesthetic appeal during your remodeling project. By keeping these considerations in mind and working closely with professionals when necessary, you can achieve a seamless transformation tailored to your home’s unique needs.

Key Steps to Take Before the Window Replacement Installers Arrive

Preparing for a window replacement project is essential for ensuring a smooth and efficient installation process. By taking some preliminary steps before the installers arrive, you can save time, protect your belongings, and make the environment safer for everyone involved. Below are key steps to consider before your window replacement project begins.

1. Clear the Work Areas

  • Remove Furniture: Move furniture away from windows being replaced to create at least 3 feet of space around each window.
  • Take Down Curtains and Blinds: Remove any curtains, blinds, or other window treatments to avoid damage or interference during installation.
  • Wall Decorations: Take down artwork, mirrors, or decorations near windows in case vibrations from tools dislodge them from walls.

2. Protect Floors and Belongings

  • Use drop cloths or plastic sheeting on floors near work zones.
  • Cover nearby furniture with old sheets or plastic tarps.
  • Store fragile items like vases or electronics in a separate room for safekeeping.

3. Ensure Outdoor Accessibility

  • Trim bushes, plants, or tree branches that block windows.
  • Remove exterior obstacles such as garden tools, outdoor furniture, or planters.
  • Unlock gates or fences that lead to applicable outdoor spaces.

A clean and accessible workspace makes it easier for contractors to complete their tasks efficiently.

4. Create a Safe Environment

  • Children & Pets: Keep children and pets away from work areas throughout the day.
    • Create barriers like baby gates where necessary.
    • Arrange for temporary pet care if needed.
  • Electrical Fixtures: Confirm that electrical cords near windows are secured and not in harm’s way.

These precautions help minimize risks while improving efficiency during installation.

5. Communicate with Your Window Installer

Questions To Ask Why It’s Important
What time will they arrive? Helps you plan your day accordingly
How long will each stage take? Prepares you for potential disruptions
Are there specific preparations required? Avoids last-minute surprises

Providing contact information in case of delays or questions is also helpful.

Final Preparations Checklist

  1. Move furniture at least 3 feet away from windows.
  2. Remove all window treatments (curtains/blinds).
  3. Cover floors and furniture with protective materials.
  4. Clear outdoor access points (trim bushes/move objects).
  5. Secure pets/children away from work zones.
  6. Confirm timing and expectations with installers beforehand.

By following these steps carefully, you’ll set the stage for an organized experience when replacing your home’s windows—a process that benefits both homeowners and professional installers alike!

Person Hand Applying Silicone Sealant With Silicone Gun Close-up Of Person Hand Applying Silicone Sealant With Silicone Gun On Window Window contractor stock pictures, royalty-free photos & images

Comprehensive Guide to Day One of Your Window Replacement Installation

The first day of your window replacement installation is crucial for setting the tone of the entire project. Understanding what happens on this day can help you prepare and ensure the process runs smoothly. Below is a detailed guide to what you can expect, along with tips to make the experience seamless.

Preparing Your Home for Installation Day

Before the installation team arrives, there are a few steps homeowners should take to ensure their home is ready for the work ahead. Proper preparation not only helps avoid delays but also protects your belongings and minimizes potential disruptions.

  • Clear Access Areas:
    Move furniture, curtains, blinds, and other items near windows to provide clear access for the installers. This includes both indoor and outdoor spaces. If there are bushes or plants obstructing windows outside, consider trimming them beforehand.
  • Protect Flooring:
    Use drop cloths or plastic sheeting to cover floors near work areas. Many professional installers bring protective materials with them, but it’s helpful to confirm in advance.
  • Remove Wall Decor:
    Vibrations from removing old windows may affect wall hangings or decorations close to the work area. Take down any fragile items like picture frames or mirrors.

What Happens During Day One?

  1. The crew will arrive at the scheduled time and go over project details with you briefly.
  2. They will unload tools, materials, and new windows from their vehicles and set up a workstation if needed (often in your driveway or yard).
  3. Installers might inspect your current windows one final time before beginning removal.
  4. This step ensures they’re aware of any unexpected issues such as structural damage or hidden water leaks.
  5. The process begins with carefully removing old window panes, frames, and hardware without damaging surrounding walls.
  6. Any debris generated during removal is typically collected immediately by professionals who prioritize cleanliness.
  7. Installers fit your new windows into place using precise measurements.
  8. Insulation material is often added around frames to improve energy efficiency.
  9. Caulking is applied on exterior edges for proper sealing against moisture and air leaks.
  10. Once installed, each window undergoes an initial test to ensure it opens/closes smoothly and provides adequate sealing.

Potential Challenges on Day One

Challenge Possible Cause Solution Provided by Installer
Discovery of Rot/Damage Hidden structural issues Repairs or reinforcements completed before continuing installation
Poor Weather Conditions Heavy rain or storms Rescheduling or temporary protective coverings
Incorrect Measurements Manufacturer error Ordering replacements promptly (may impact timeline)

Discuss these possibilities with your contractor beforehand so you’re prepared if adjustments need to be made.

Tips for Homeowners During Installation

  • Communicate any concerns directly with the project manager on-site.
  • Keep children and pets away from work areas for safety reasons.
  • Verify that all installed products match your order specifications (e.g., style, color).

Remember that disruptions like noise or temporary drafts are normal during this stage but will be worth it once your new windows are fully installed.

Understanding What Happens if Your Window Replacement Installation Extends to a Second Day

Window replacement projects are often carefully planned to ensure efficiency and minimal disruption. However, unforeseen factors such as weather conditions, the complexity of the installation, or additional repairs can sometimes extend the project to a second day. Being prepared for this possibility can help you navigate the situation smoothly. Here’s what you need to know if your window replacement installation takes longer than expected.

Common Reasons for Installation Delays

  • Weather Conditions: Rain, snow, or extremely high winds can halt outdoor work and may delay the process.
  • Structural Issues: Unexpected damage such as rotted wood, mold, or poorly installed framing may require immediate attention before new windows are installed.
  • Custom or Specialty Windows: Installing large or uniquely shaped windows might take more time due to their size or complexity.
  • Project Scope: Replacing multiple windows in a large home may naturally take more than one day.

By understanding these common causes, you’ll know what to expect and how best to prepare for possible delays.

What Homeowners Should Do on Day Two

  1. Check with your contractor about when the crew will return on Day Two so you can plan around their schedule.
  2. If any window openings are left unfinished at the end of Day One, ask your contractor how these areas will be secured overnight (e.g., temporary boarding). This ensures safety and energy efficiency until work resumes.
  3. Move furniture and delicate items from areas near unfinished windows if they’re not already cleared from Day One.
  4. Request an update on what has been completed versus what remains so you have a clear picture of when each room will be finished.

Tips for Working with Your Contractor

Communication Tips Why They Matter
Request a Revised Timeline Helps set realistic expectations moving forward
Ask About Added Costs Ensures there are no unexpected fees
Inquire About Crew Size Larger teams may speed up completion
Provide Feedback from Day One Allows contractors to address concerns immediately

Establishing open dialogues helps prevent misunderstandings and ensures that both parties remain aligned throughout the process.

Additional Considerations for Ongoing Projects

  • Plan Around Noise Levels: Continued construction noise could interfere with at-home activities such as remote work or study sessions.
  • Be Flexible with Space Use: Rooms near unfinished windows may need to stay off-limits temporarily.
  • Monitor Pets and Children: Keep them away from active work zones for safety reasons until all installations are complete.

By staying organized and proactive, homeowners can minimize stress even during unanticipated delays in their window replacement projects.

Extending into a second day is not uncommon during larger installations or when unforeseen challenges arise. With proper preparation and open communication between homeowners and contractors, this additional time can result in a successful project that meets expectations without unnecessary frustration.

Finding the Right Window Replacement Contractor for Your Home

When it comes to window replacement, hiring the right contractor is critical to ensure a seamless process and high-quality results. Not all contractors are created equal, so taking the time to evaluate your options thoroughly can save you from potential headaches and costly mistakes. Below, we’ll explore key factors to consider when choosing a window replacement contractor.

1. Verify Credentials and Certifications

  • Licensure: Verify that the contractor holds a valid license for residential window installation.
  • Insurance: Ensure they carry both general liability insurance and workers’ compensation coverage.
  • Certifications: Look for certifications from manufacturers or industry groups like the American Window and Door Institute (AWDI) or InstallationMasters™.

These credentials demonstrate their expertise and commitment to industry standards.

2. Check Experience and Expertise

  • How long have they been in business?
  • Do they specialize in residential window replacements?
  • Can they handle unique challenges, such as historical homes or custom windows?

Experienced contractors are more likely to deliver efficient services with fewer errors.

3. Read Reviews and Ask for References

  • Online Platforms: Search for reviews on trusted sites like Google, Yelp, or Angie’s List.
  • References: Request references from past clients who had similar projects completed.

Take note of any recurring issues mentioned in negative reviews, even if there are positive comments.

4. Request Detailed Quotes

Item Description Estimated Cost
Window Materials Type of glass, frame material $XXX
Labor Costs Hourly rate or flat fee $XXX
Additional Services Disposal of old windows, cleanup $XXX

Avoid contractors who provide vague estimates or pressure you into signing without fully understanding the costs involved.

5. Assess Communication Skills

Effective communication is vital during any home improvement project. Evaluate how quickly potential contractors respond to inquiries or provide updates throughout the selection process. Look for signs that they prioritize customer service by being proactive, clear in their explanations, and willing to address concerns.

6. Confirm Warranties Offered

  • Manufacturer Warranty: Covers defects in windows themselves (e.g., glass breakage).
  • Workmanship Warranty: Ensures proper installation by covering labor-related issues.

Ask about warranty terms upfront so you know exactly what protections are available after completion.

Red Flags to Watch Out For:

Be cautious if you encounter any of these warning signs: 1. High-pressure sales tactics. 2. Unwillingness to provide references or documentation. 3. Lack of transparency about costs or warranties. 4. Extremely low bids compared to competitors (which could suggest subpar materials or shortcuts).

By carefully evaluating each contractor based on these factors, you’ll set yourself up for success when replacing your home’s windows with confidence that your investment will last for years to come.